That’s not to say that they don’t work, or that they aren’t worth the money that people sell them for. It’s just that most of the pricing calculators have some major flaw that makes them not nearly as effective as I think they could be. It’s for this reason that I decided to create an easy and straight-forward photography pricing guide for photographers that shows you how to price photography.
How To Be An Affordable AND Profitable Photographer
In a perfect world, you’d be able to charge whatever you wanted, people would be willing and able to pay it, and you’d have all the clients you could ever want.
There’d also be rainbows and unicorns prancing around every day. And perfect light. And no client complaints. And more hours in the day. And free gelato for all (yum!).
But that’s just not how it is.
It’s really hard to run a profitable photography business.
If you haven’t ever looked at the numbers, it’s likely far more expensive than you think.
In fact, to be both “affordable” and yet still charge enough to make it worth it to you without your business going under is difficult. However, I’ve heard from several people lately who want to be both.
So I’m going to tell you exactly what you need to do in order to be affordable and still keep your business afloat and profitable. [Click to read more]
Should You Look at Other Photographers’ Prices When Setting Your Own Pricing?
You know, where another photographer poses as a client and asks for more information because they just want to see your prices.
It’s one of the most annoying things you’ll deal with as a photographer (and yes, we know you’re doing it. There are hints that make it more than clear). So don’t do it.
If you want to see someone’s prices, simply ask them. They may or may not let you see them, but at least you’ll keep your dignity and not burn a bridge. Having good relationships with other photographers is priceless and can help you grow your business faster (it’s true!) so it’s not worth the risk.
The real questions is, though, is it really a good idea to look at the prices of other photographers anyways?
Let’s look at the pros and cons of seeing other price lists, and how to get them without being unethical and lying. [Click to read more]
When Should You Show Clients Your Full Pricing?
You’d likely get a lot of really confused looks, some rude comments, and maybe a few kisses if you’re not too creepy.
However, built into each one of us is a sub-conscious desire to be consistent that is so strong that it could get strangers to kiss you and clients to book you that might have otherwise said no.
Don’t believe me? Watch this video and see if you can figure out how they did it. It’s worth a few minutes of your time.
Besides being ridiculously entertaining, this demonstrates the principle of consistency, which can be super powerful in converting people into clients. Let’s talk about what’s happening here and how you can use these same principles to get more clients, specifically by making sure you’re showing your pricing at the right time.
How to Raise Your Photography Prices Significantly Without Losing All Your Clients
The market is saturated with people charging hardly anything and doing things irresponsibly. If you know your numbers it can be hard to believe how much more you need to be charging to make what you need to be making. It doesn’t seem possible.
Yet you’re awesome because you are committed to being profitable and are ready to make the leap into the higher prices you deserve. No more pretending you’re making more than you really are, no more excuses. You’re ready to put on your big girl panties and making the leap into running a successful and profitable photography business.
So you raise your prices a lot. And suddenly you hear crickets. Nothing, not even an inquiry. You start to doubt yourself, your work, your ability to stay in business, and you are tempted to either drop your prices back to where they were or quit altogether.
Sound familiar? It doesn’t have to be this way.
So let’s talk this through, let’s do this the smart way, and let’s start making more money and avoiding some common pitfalls.
7 Reasons NOT to Raise Your Prices
Photographers LOVE to tell other photographers to raise their prices.
It’s a bit like a badge of honor, as if they are saying, “I’ve gotten to these prices, so you should be here too.”
While I believe there are many, MANY good reasons to raise your prices, and I’ve told other photographers that they should raise their prices as well, there are several good reasons why this is sometimes a poor decision.
So let’s jump in and consider the times when it’s a bad idea to raise your prices.
Photography is a Luxury Business, Not a Discount Store
Photography is one of the worst types of businesses start if you’re simply looking to make some extra money.
It’s based on your time, which is limited, so your potential income is limited. Even if you start a studio and hire additional photographers, you’re not truly scaling your business very far.
There’s a low barrier to entry as the cost of equipment comes down and there’s no special schools or trainings required, causing market saturation (and high competition for clients) in almost all areas.
You also build very little equity, so if you decide to retire and sell the business, you won’t make much compared to other businesses and you may not even be able to sell the business at all.
On top of all that, it’s a creative service so its value is hard to quantify.
I’m not trying to depress you with these facts, and I’m certainly not saying you can’t have a profitable business.
If you want to have a successful photography business and really make money with photography, there’s one very important thing that you need to know and live by. [Click to read more]
How To Create Photography Packages That Sell
As I have been helping photographers with their pricing and packaging, I’ve seen a number of common mistakes over and over again that are easy to avoid and will help boost your sales.
Before making packages, however, make sure you’ve worked through the Photographer’s Pricing Guide to determine how much money you need to be making on average per shoot. We’ll use this information in setting up your packages.
So let’s jump right in! [Click to read more]
What Wedding Photography Pricing Model Should You Use For Maximum Profit?
There’s so many different wedding photography pricing models that sometimes it’s hard to know what will be most profitable for you and your business.
Should you have packages? Or go completely A la Carte? Which one books you more clients and gets you higher sales?
There’s an easy way to tell, and the answer will be different for each person.
So first we’ll look at 3 wedding pricing and packaging models, discuss their strengths and weaknesses, and then you’ll learn how to determine which one you should use to maximize your profits.
Photographer’s Pricing Guide: Pricing and Your Market
This post is the final installment of The Modern Tog’s Photographer’s Pricing Guide series. Here’s the link to Part 1 of the Pricing Guide in case you missed it.
If this is the first time working through a pricing guide, you may be shocked at how much you need to charge to make your desired profit. If you are just starting out and still building a portfolio, you may not feel like you have the experience or quality to be charging that amount yet, or maybe you simply do not believe that anyone in your market would be willing to pay those prices.
Let’s tackle these issues one at a time. [Click to read more]
Photographer’s Pricing Guide: Creating Packages
It’s finally time to pull together all the pieces you’ve been working on so far and decide what kind of packages you are going to offer. Before you do this, I highly suggest taking some time to think about your business model. Will you have multiple packages for each type of shoot or do everything a la carte? Or maybe you’ll have one package with several add-on options. Determining how to structure your photography pricing is probably the most difficult part of this step.
If you decide that having packages is best for you, click here to learn how to create photography packages that sell.
Creating Packages
Let’s say that the average amount needed for a portrait shoot is $750. There are several ways that we can get to this number. You can simply charge a session fee and hand over the digital files or you can create a package that includes enough products you offer to get you to the price you need. When you do this, you need to be adding up the Retail Less Costs of Goods. If you use the selected retail amount, you’ll fail to account for the cost of goods and will make less than you should to reach your needed average.
For this example I’m going to create a package completely out of products I offer and not charge an additional session fee. I’ll use the following products as an example.
-
Fine Art Album (Retail Less Cost of Goods: $550, Selected Retail Price: $750)
Print Collection (Retail Less Cost of Goods: $200, Selected Retail Price: $250)
So if we want a package to be $750 after cost of goods, we can select both the Fine Art Album ($550 Retail Less Cost of Goods) and the Print Collection ($200 Retail Less Cost of Goods) to get us to exactly $750. We’d then have to add up the Selected Retail Price of the items to know what to charge our customers for this package. In this case, we’d have to add $750 and $250 to get $1000, which is what we’d charge our customers to ensure that we’re making $750 after we pay for the album and prints.
Making it easy with the Photographer’s Pricing Guide Workbook
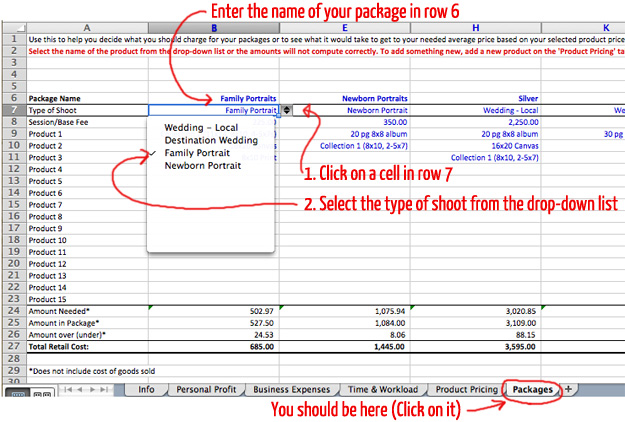
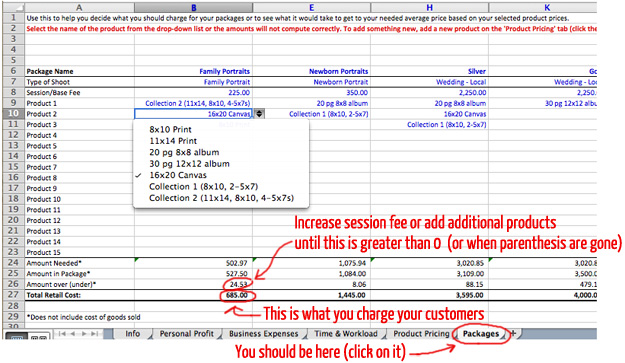
If you’re using the Photographer’s Pricing Guide Workbook, go to the Packages tab at the bottom of the screen. Then enter the name of your package in row 6. Click the cell right below that in row 7 and select the type of shoot from the drop-down menu.
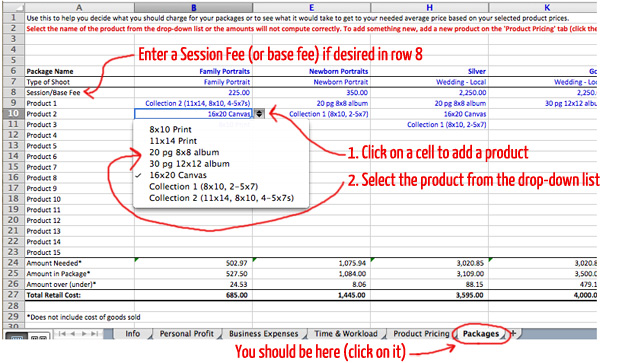
Next, enter a session fee in row 8 if you wish to use one. If not, leave this blank. To add a product to your package, click on a cell and select the desired product from the drop-down list. To add another product to the list, go back to the “Product Pricing” tab (click on it at the bottom of the worksheet) and add it there.
You’ll automatically see the amount needed in row 24, as well as the amount in the package based on what you’ve added so far (row 25). What you’ll want to do is watch the number in row 26, which tells you if you’re under or over the amount you need (a parenthesis around the number means you’re under where you need to be at). My smallest packages are usually slightly below the amount needed, whereas the rest of my packages are about equal or greater than where I need them to be. Your business model should help dictate exactly where you want the packages to be priced in comparison to your average amount needed.
Finally, once your package includes what you want it to include, you’ll see your retail price (what you need to charge your customers) in row 27.
In our next post, we’ll wrap up this series with a discussion about how to take the numbers you’ve just computed and make them work in your market.